
フロントで TypeScript を使うとなると当然デバッグしたい。console.log でデバッグなんて、時間がかかるし、コード追加しないといけないので嫌だ。TypeScript のデバッグは、作業効率においてかなり大事。
そんな思いから、今回は TypeScript babel webpack を使う ASP.NET Core プロジェクトを準備して、Visual Studio Code(以降、VSCode)で、TypeScript をデバッグします。
ローカル環境
| Client OS | Windows10 |
| WSL | Ubuntu 18.04.2 LTS |
| Editor | Visual Studio Code |
| SDK | ASP.NET Core 3.1 |
ASP.NET Core の Developing in WSL はこちらを参考にしてください。

TypeScript babel webpack
TypeScript babel webpack メリットと導入方法
以下の記事で紹介しています(Windows 10 + Visual Studio 2019 環境での導入方法)

TypeScript babel webpack インストール
ここからは、前回作成した ASP.NET Core プロジェクトを使用します。

まず、WSL Ubuntu に接続します。コマンドプロンプトを起動して wsl と入力後 Enter します。 作成済の ASP.NET Core MVC プロジェクトファイルのディレクトリに移動して、次のコマンドを実行します。
パッケージインストール
|
1 2 3 4 5 6 7 8 9 10 11 12 13 |
// package.json を生成 npm init // TypeScript インストール npm install -D -E typescript // babel インストール npm install -D -E @babel/core @babel/preset-env core-js // webpack インストール // fsevents@^1.2.7 の警告が表示されるが Mac 用なので無視 npm install -D -E webpack webpack-cli babel-loader ts-loader // fetch polyfill をインストール npm install -D -E whatwg-fetch // TypeScript、babel、webpack の構成ファイルを作成 touch tsconfig.json babel.config.js webpack.config.js |
これで各種インストールと構成ファイルの作成が完了しました。次は TypeScript のデバッグに必要となるソースマップを出力するように構成します。
tsconfig.json
|
1 2 3 4 5 6 7 8 9 10 11 12 13 14 15 16 17 18 19 20 |
{ "compilerOptions": { "noImplicitAny": false, "noEmitOnError": true, "removeComments": false, "sourceMap": true, "downlevelIteration": true, "declaration": true, "declarationMap": true, "target": "es5", "lib": [ "ES2020", "ES2020.Promise", "dom", "dom.iterable" ], "module": "ES2020", "outDir": "wwwroot/ts/" }, "exclude": [ "node_modules", "wwwroot" ], "include": [ "TypeScripts/*" ] } |
babel.config.js
|
1 2 3 4 5 6 7 8 9 10 11 12 13 |
module.exports = function (api) { api.cache(true); const presets = [["@babel/preset-env", { targets: [">0.25% in JP", "not ie <= 10", "not dead"], useBuiltIns: "usage", corejs: 3, // core-js のバージョン }]]; return { presets }; }; |
webpack.config.js
|
1 2 3 4 5 6 7 8 9 10 11 12 13 14 15 16 17 18 19 20 21 22 23 24 25 26 |
const path = require("path"); module.exports = { mode: process.env.NODE_ENV, entry: { "main": path.resolve(__dirname, "TypeScripts/Main.ts"), }, output: { path: path.resolve(__dirname, "wwwroot/js"), filename: "[name].bundle.js" }, resolve: { extensions: [".ts", ".js"] }, devtool: 'source-map', module: { rules: [ { test: /\.ts$/, loaders: ["babel-loader", "ts-loader"] } ] }, plugins: [ ] }; |
次に、ビルド、トランスパイル、バンドルを実行できるように npm-scripts を構成します。
npm-scripts 構成
package.json
|
1 2 3 4 5 |
"scripts": { "build": "webpack --mode=development", "release": "webpack --mode=production", "publish": "npm run release && dotnet publish -c Release" }, |
補足: npm-scripts を VS Code のサイドパネルから実行
表示/コマンドパレット or Ctl+Shift+P でコマンドパレットを表示します。Preferences: Open User Settings と入力すると VS Code の基本設定タブが表示されます。拡張機能/NPM の Enable Script Explorer を On にします。
次は、tasks.json に npm-scripts をタスクとして追加します。
tasks.json
npm-scripts
|
1 2 3 4 5 6 7 8 9 10 11 12 13 14 15 |
{ "label": "build-npm-script", "command": "npm", "type": "process", "args": [ "--prefix", "${workspaceFolder}/src/WebMvc", "run", "build" ], "problemMatcher": [ "$ts-webpack", "$tslint-webpack" ] }, |
“problemMatcher” には、「TypeScript + Webpack Problem Matchers for VS Code」拡張機能を使用しています。
続いて、前回作成した “build-mvc” タスクの前に “build-npm-script” タスクを実行するように変更します。
シーケンシャル実行
“dependsOrder”: “sequence” を使ってシーケンシャルに実行します。
|
1 2 3 4 5 6 7 8 9 10 |
{ "label": "build-mvc-compounds", "type": "shell", "command": "echo build Done ", "dependsOrder": "sequence", "dependsOn": [ "build-npm-script", "build-mvc" ] } |
次は、launch.json のデバッグ構成を変更します。
launch.json
前回作成した “Launch MVC” の “preLaunchTask” を先ほど作成したタスクに変更します。
|
1 |
"preLaunchTask": "build-mvc-compounds", |
Debugger for Chrome
続いて本日のメインテーマである TypeScript をデバッグ するために Debugger for Chrome(前回インストール済み)の構成を追加します。
|
1 2 3 4 5 6 7 8 |
{ "type": "chrome", "request": "launch", "name": "Launch Chrome MVC", "url": "https://127.0.0.1:5002", "webRoot": "${workspaceRoot}/src/WebMvc", "sourceMaps": true, } |
サンプルコード
WebApi.Controllers.WeatherForecastController に丁度いい Get アクションが用意されているので、WebMvc.Views.Home.Index ビューから取得して表示するサンプルコードを準備します。
Main.ts
|
1 2 3 4 5 6 7 8 9 10 11 12 13 14 15 16 17 18 19 20 21 22 23 24 25 26 27 28 29 30 31 32 33 34 35 36 37 38 39 40 41 42 43 44 45 46 47 48 49 50 51 52 53 54 55 56 57 58 59 60 61 62 |
import 'whatwg-fetch'; import { HttpClientImple, HttpClient } from "./HttpClient"; import { EventName } from "./EventName"; import { WeatherForecast } from "./WeatherForecast"; class Main { private url: string; private http: HttpClientImple; constructor(url: string) { this.url = url; this.http = new HttpClient(); } public load(): void { const clickHandler = { handleEvent: async (event: MouseEvent): Promise<void> => { try { const weathers = await this.http.get<WeatherForecast[]>(this.url, new URLSearchParams()); for(const weather of weathers) { this.appendResult(weather); } } catch(error) { console.log(`get error: ${error.message}`); } } } const btn = document.getElementById("btn-get"); btn.addEventListener(EventName.Click, clickHandler, { once: false, passive: true, capture: false }); } private appendResult(weather: WeatherForecast): void { const createDiv = (classNames: string[], innerHTML: string) => { const elem = document.createElement("div"); elem.classList.add(...classNames); elem.innerHTML = innerHTML; return elem; } const createCard = (weather: WeatherForecast): HTMLElement => { const card = createDiv(["card", "mb-2"], ""); const header = createDiv(["card-header"], new Date(weather.date).toDateString()); const body = createDiv(["card-body"], `${weather.summary}: ${weather.temperatureC}`); card.appendChild(header); card.appendChild(body); return card; } let target = document.getElementById("result"); target.appendChild(createCard(weather)); } } const loadHandler = { handleEvent: (event: Event) => { const mod = new Main("http://localhost:5003/weatherforecast"); mod.load(); } } window.addEventListener(EventName.Load, loadHandler, { once: true, passive: true, capture: false }); |
HttpClient.ts
Web Mvc のビューから fetch() を使った WebApi 接続になるので mode をデフォルトの ”same-origin” から ”cors” に変更しています。また、WebApi 側で CORS を有効にする必要があります(今回は ASP.NET Core のお話ではないので Api 側の実装は省略)。
|
1 2 3 4 5 6 7 8 9 10 11 12 13 14 15 16 17 18 19 20 21 22 23 24 25 26 27 28 29 30 |
export class HttpClient implements HttpClientImple { constructor() { } public async get<T>(url: string, param: URLSearchParams): Promise<T> { const response = await fetch(`${url}?${param}`, { method: "get", mode: "cors", // no-cors, cors, *same-origin headers: { "accept": "application/json" }, }); return this.resposeJson<T>(response); } private async resposeJson<T>(response: Response): Promise<T> { if (response.ok) { return response.json() as Promise<T>; } else { if (response.status == 400) { const mes = await response.json() as string; throw new Error(mes); } else { throw new Error(`get status: ${response.status} | statusText: ${response.statusText}`); } } } } export interface HttpClientImple { get<T>(url: string, param: URLSearchParams): Promise<T>; } |
WeatherForecast.ts
|
1 2 3 4 5 6 7 8 9 10 11 12 13 14 15 16 17 18 19 20 21 22 23 24 25 26 27 28 29 30 31 32 33 34 35 36 37 38 39 40 41 42 43 44 |
export class WeatherForecast { constructor() { } private _date: Date; get date(): Date { return this._date; } set date(date: Date) { this._date = date; } private _temperatureC: number; get temperatureC(): number { return this._temperatureC; } set temperatureC(temperatureC: number) { this._temperatureC = temperatureC; } private _temperatureF: number; get temperatureF(): number { return this._temperatureF; } set temperatureF(temperatureF: number) { this._temperatureF = temperatureF; } private _summary: string; get summary(): string { return this._summary; } set summary(summary: string) { this._summary = summary; } } |
WebMvc.Views.Home.Index.cshtml
|
1 2 3 4 5 6 7 8 9 10 11 12 13 14 |
@{ ViewData["Title"] = "Home Page"; } <div class="text-center"> <h1 class="display-4">Welcome</h1> <p>Learn about <a href="https://docs.microsoft.com/aspnet/core">building Web apps with ASP.NET Core</a>.</p> </div> <button type="button" id="btn-get" class="form-control btn-info mb-5">取得</button> <div id="result"></div> @section scripts { <script src="~/js/main.bundle.js"></script> } |
デバッグ
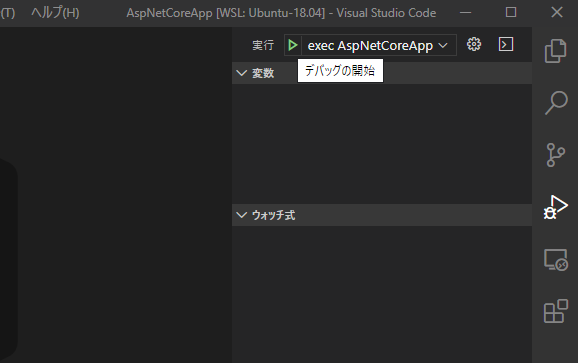
それではデバッグしてみましょう。launch.json で構成した ”exec AspNetCoreApp” を実行します。
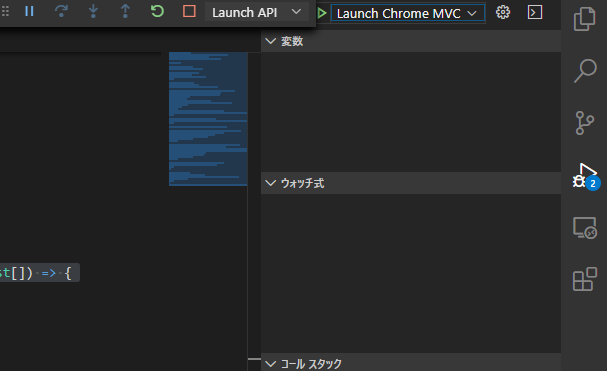
次に、Main.ts の任意の場所にブレイクポイントを設定して ”Launch Chrome MVC” を実行します。

これで開発効率、あがりそうです。


