
例えば最新の ECMAScript バージョンの学習であれば、レガシーブラウザ(IE 11など)は無視しても良いと思いますが、Production となると話は別です。まだまだ、IE ユーザは健在ですし、IE で動作することが要件となることも事実です。
しかし、実装を IE 11 にあわせるとなると ES2015 すら使えません。そこで、活躍するのが、webpack + Babel + TypeScript の開発環境です。
TypeScript は静的型付け、最新の ECMAScript での実装と javascript のトランスパイル。そして、Babel はレガシーブラウザで動作するように トランスパイル + polyfill(今回は 自動 polyfill 目的で使用)。最後に webpack でバンドル。それでは、webpack + Babel + TypeScript の開発環境の構築を進めていきます。
- Visual Studio 2019(ASP.NET Core MVC を使用)
- npm インストール済
パッケージ管理
package.json の初期化
プロジェクトファイル(.csproj)がある階層に移動してコマンドを実行します。
|
1 2 3 4 5 6 7 8 9 10 11 12 13 14 15 16 17 18 19 20 21 22 23 24 25 26 27 28 29 30 31 32 |
# 初期化 npm init package name: (asp.net) myapp version: (1.0.0) 1.0.0 description: entry point: (index.js) test command: git repository: keywords: author: owl license: (ISC) About to write to C:\Users\kfami\source\repos\CalcDeviationValue\Mvc\package.json: { "version": "1.0.0", "name": "myapp", "private": true, "devDependencies": { "typescript": "3.6.2" }, "main": "index.js", "dependencies": {}, "scripts": { "test": "echo \"Error: no test specified\" && exit 1" }, "author": "owl", "license": "ISC", "description": "" } Is this OK? (yes) y |
パッケージ インストール
|
1 2 3 4 5 6 |
# TypeScript インストール npm install -D -E typescript # Babel インストール npm install -D -E @babel/core @babel/preset-env core-js # webpack インストール npm install -D -E webpack webpack-cli clean-webpack-plugin@1.0.1 ts-loader |
パッケージのバージョンリスト
|
1 2 |
# ex) @babel/core のバージョンリストを確認する場合 npm info @babel/core versions |
package.json
各パッケージインストール後の package.json は次のようになります。
|
1 2 3 4 5 6 7 8 9 10 11 12 13 14 15 16 17 18 19 20 21 22 23 |
{ "name": "asp.net", "version": "1.0.0", "description": "", "main": "index.js", "author": "owl", "license": "ISC", "scripts": { "test": "echo \"Error: no test specified\" && exit 1" }, "private": true, "devDependencies": { "@babel/core": "7.6.0", "@babel/preset-env": "7.6.0", "babel-loader": "8.0.6", "clean-webpack-plugin": "1.0.1", "core-js": "3.2.1", "ts-loader": "6.1.0", "typescript": "3.6.2", "webpack": "4.39.3", "webpack-cli": "3.3.8" } } |
さらに、公開はしないので “private”: true の項目を追加します。
今回は WebPack Task Runner を使用しますが、以下のコマンドで実行できます。
|
1 2 3 4 5 6 7 8 |
# package.json の scripts に以下の設定をした場合 "scripts": { "build": "webpack --mode=development --watch", "release": "webpack --mode=production", "publish": "npm run release && dotnet publish -c Release" }, # コマンド実行 npm run build | release | publish |
TypeScript
tsconfig.json を作成します。プロジェクト右クリック/追加/新しい項目/ASP.NET Core/Web/TypeScript JSON 構成ファイルを選択します(デフォルトで名前は tsconfig.json になっているはずです)
tsconfig.json の設定を変えて単体で動確したいので、次のようにカスタマイズします。
|
1 2 3 4 5 6 7 8 9 10 11 12 13 14 15 16 17 18 19 20 21 |
{ "compileOnSave": true, // add "compilerOptions": { "noImplicitAny": false, "noEmitOnError": true, "removeComments": false, "sourceMap": true, "downlevelIteration": true, // add -> Provide full support for iterables in for..of, spread and destructuring when targeting ES5 or ES3. "declaration": true, // add -> Generates corresponding .d.ts file "declarationMap": true, // add -> Generates a sourcemap for each corresponding ‘.d.ts’ file. "target": "es5", "lib": [ "es2015", "es2015.promise", "dom", "dom.iterable" ], // add "module": "es2015", // add -> Specify module code generation: "None", "CommonJS", "AMD", "System", "UMD", "ES6", "ES2015" or "ESNext". "outDir": "wwwroot/ts/" // add }, "exclude": [ "node_modules", "wwwroot" ], "include": [ "TypeScripts/*" ] // add } |
tsconfig.json
compileOnSave
Visual Studio を使用していると、ファイル保存時に自動で “outDir” に js が生成されます。
target
ECMAScript バージョンを指定します。指定したバージョンで js が生成されます。
lib
コンパイルに含めるライブラリのファイルの一覧を指定します。例えば、target: es5 を指定すると、実装で Promise を使うとコンパイルエラーになりますが、 lib を指定することにより制御できます。
downlevelIteration
target: es5 を指定した場合に、実装で例えば for..of を使うとコンパイルエラーになりますが、true にすることで iterables をサポートしてくれます。
outDir
js の出力先を指定します。
include
コンパイル対象を指定します。
Babel
Babel 7.4 から @babel/polyfill が非推奨になり、core-js のバージョンを指定して直接 polyfill を読み込む方法になっています。
tsconfig.json と同様の手順で babel.config.js を作成します。
babel.config.js
|
1 2 3 4 5 6 7 8 9 10 11 12 13 |
module.exports = function (api) { api.cache(true); const presets = [["@babel/preset-env", { targets: [">0.25% in JP", "not ie <= 10", "not dead"], useBuiltIns: "usage", corejs: 3, // core-js のバージョン }]]; return { presets }; }; |
@babel/preset-env
@babel/preset-env is a smart preset that allows you to use the latest JavaScript without needing to micromanage which syntax transforms (and optionally, browser polyfills) are needed by your target environment(s). This both makes your life easier and JavaScript bundles smaller!
targets
アプリがサポートする環境を指定します。ここでは、browserslist のクエリ構成で指定しています。https://browserl.ist/ で対象ブラウザを確認できます。
useBuiltIns
useBuiltIns: “usage” は、各ファイルで必要な polyfill のみ追加します。
window.fetch polifill
window.fetch is not a cross-platform feature, in some environments, it makes no sense. For this reason, I don’t think it should be in core-js. Looking at a large number of requests it might be added in the future. Now you can use, for example, this polyfill.
と core-js の説明にあったので window.fetch polyfill を使用します。
|
1 2 |
# fetch polyfill をインストールします npm install -D -E whatwg-fetch |
webpack
At its core, webpack is a static module bundler for modern JavaScript app lications. When webpack processes your application, it internally builds a dependency graph which maps every module your project needs and generates one or more bundles.
モジュールバンドラーです。前回の記事のパフォーマンス改善の解決策の1つですね。

webpack.config.js
webpack.config.js を次のようにカスタマイズします。
|
1 2 3 4 5 6 7 8 9 10 11 12 13 14 15 16 17 18 19 20 21 22 23 24 25 26 27 28 29 30 31 32 |
const path = require("path"); const CleanWebpackPlugin = require("clean-webpack-plugin"); module.exports = { // 'development' | 'production' mode: process.env.NODE_ENV, // entry points -> ts ファイルを指定(複数可) // https://webpack.js.org/concepts/entry-points/#multi-page-application entry: { "main": path.resolve(__dirname, "TypeScripts/Main.ts") }, output: { path: path.resolve(__dirname, "wwwroot/js"), filename: "[name].bundle.js" }, resolve: { extensions: [".ts", ".js"] }, module: { rules: [ { test: /\.ts$/, // ローダーをチェーン化する場合は 右 -> 左 で処理 // https://webpack.js.org/configuration/module/#ruleuse loaders: ["babel-loader", "ts-loader"] } ] }, plugins: [ new CleanWebpackPlugin(["wwwroot/ts/*"]) ] }; |
WebPack Task Runner
Visual Studio Marketplace から WebPack Task Runner をダウンロードします。Adds support for WebPack in Visual Studio 2015 and 2017’s Task Runner Explorer とありますが、まぁ 2019 でも大丈夫だろということでインストールです。

タスクランナー エクスプローラーにある [Run – Development] を実行すると、webpack.config.js の output で指定したフォルダに main.bundle.js が生成されます。そして tsconfig.json で指定した “outDir” のフォルダを確認すると、es5 の構文(機能は polyfill)で js ファイルが正常に(コンパイルエラーになることなく)生成されています。
IE 11 で動確
IE 11 で動確するために、前回記事 ↓ のビューとスクリプトを変更します。
動確の準備
Index.cshtml
|
1 2 3 4 5 6 7 8 |
<h2>数学のテストの点数</h2> <!-- fetch polyfill を確認するために非同期で部分ビューを取得するように変更します --> <div id="statistic"></div> @section Scripts { <!-- バンドルした js です --> <script src="~/js/main.bundle.js"></script> } |
Main.ts
次は動的インポートの実装から fetch を使用した実装に変更します。
|
1 2 3 4 5 6 7 8 9 10 11 12 13 14 15 16 17 18 19 20 21 22 23 24 25 26 27 28 29 30 31 32 33 34 35 36 37 38 39 40 41 42 43 44 45 46 47 48 49 50 51 52 53 54 55 56 57 58 59 60 61 62 63 64 65 66 67 68 69 |
// add fetch polyfill import 'whatwg-fetch' // modify from "***.js" remove .js (all .ts files) import StudentScoreStatistics from "./StudentScoreStatistics"; import Statistics from "./Statistics"; import Student from "./Student"; import Subject from "./Subject"; import { SubjectType } from "./SubjectType"; import StatisticsOneDimCalculator from "./StatisticsOneDimCalculator"; class Main { constructor() { } public execute(): void { let elems = <NodeListOf<HTMLInputElement>>document.body.querySelectorAll("input[type=\"number\"]"); let subjectType: SubjectType = SubjectType.Math; let students: Student[] = this.createStudents(elems, subjectType); let result: StudentScoreStatistics = this.calculate(students, subjectType); this.setCalculateResult(result, subjectType, students); } private createStudents(elements: NodeListOf<HTMLInputElement>, subjectType: SubjectType): Student[] { let students: Student[] = []; for (const elem of elements) { let id = elem.getAttribute("data-deviation"); students.push(new Student(id, [new Subject(subjectType, Number(elem.value))])); } return students; } private calculate(students: Student[], subjectType: SubjectType): StudentScoreStatistics { let result = new StudentScoreStatistics(students, new StatisticsOneDimCalculator()); result.calculate(subjectType); return result; } private setCalculateResult(statistics: Statistics, subjectType: SubjectType, students: Student[]): void { let mean = document.getElementById("mean"); mean.textContent = statistics.mean().toString(); let variance = document.getElementById("variance"); variance.textContent = statistics.var().toString(); let standard = document.getElementById("standard"); standard.textContent = statistics.std().toString(); for (const student of students) { let devVal = student.getDevVal(subjectType, statistics.mean(), statistics.std()); let elem = document.getElementById(`${devVal[0]}`); elem.textContent = devVal[1].toString(); } } } // add fetch("/Home/GetStatisticPartial") .then(response => { return response.text(); }) .then(html => { let elem = document.getElementById("statistic"); elem.innerHTML = html; let main = new Main(); let btn = document.getElementById('calc'); btn.addEventListener('click', () => { main.execute(); }, { once: false, capture: false, passive: true }) }) .catch(error => { console.log(`error: ${error.message}`); }); |
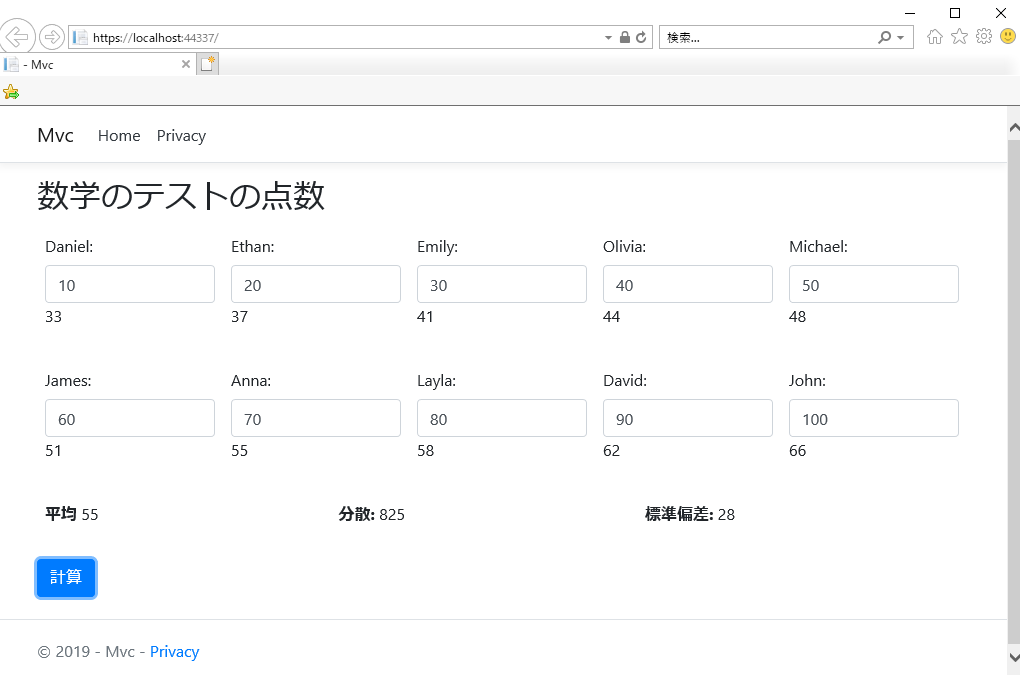
IE 11 でデバック実行
デバック実行前に Main.ts を変更したため、再度タスクランナーを実行します。
IE 11
google developer tools
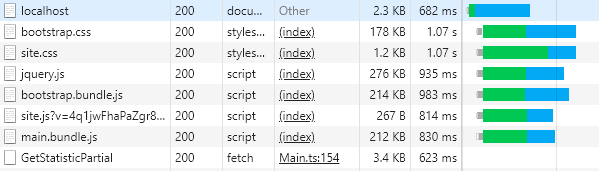
バンドルされているため 1 ファイルで、且つ IE 11 で正常に表示され、動作しています。素晴らしい!満足です。Production は minify するべきですが、それはまたの機会に。
より実践で役立つ 「Visual Studio Code で TypeScript をデバッグ(using TypeScript babel webpack)」を ↓ で紹介しています。


